
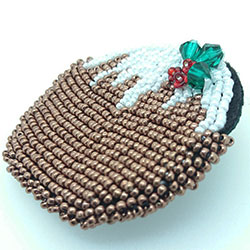
Christmas Pudding Brooch
| Shopping List: Click on the highlighted links below to go shopping yourself!
|
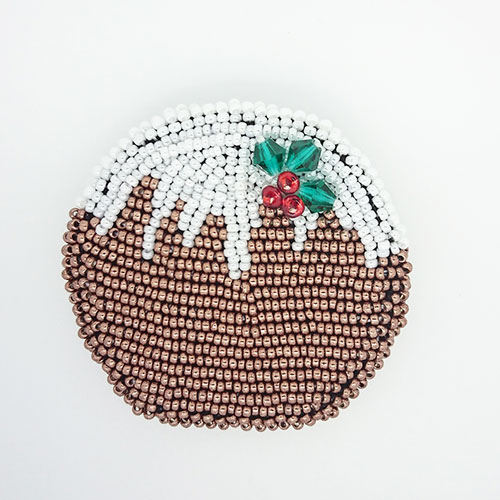
We think this Christmas Pudding brooch looks almost good enough to eat, and it's much simpler to make than the real thing! We have shown the instructions for the design of the pudding on white foundation, as it is easier for you to see and follow. We have detailed instructions below, however if you are comfortable with Bead Embroidery, we have a brief outline of all the steps at the end if you prefer.
1. Decide on the size for your Christmas Pudding Brooch. The bead quantities above are for the brooch shown, measuring approx. 6cm in diameter.
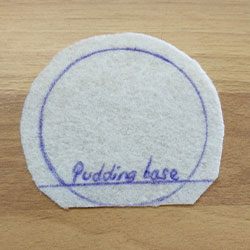
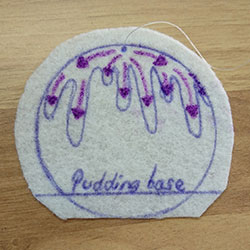
| 2. On your beading foundation, draw around something circular, making sure you leave approx. 1cm border around the outside edge for you to trim and stitch your edging beads onto later on (we used our lost and found stash pot of beads!) |
| 3. Cut out your shape, remembering to leave the border outside your circle shape. We also cut a small section off the bottom of the circle to give the pudding its flat base. |
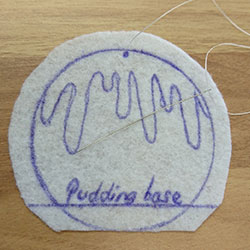
4. On your shape, draw out the top of the pudding, imagining how the brandy sauce looks running down (yummy!). If you need some inspiration, try Googling images of cartoon Christmas puddings, as they will give you a good idea of what it could look like. We found all these below on Google Images
|
|
|
|
|


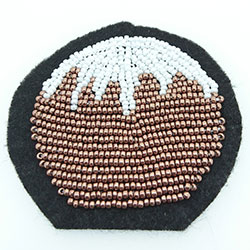
| 5. Once you have got your shape and the outline for the topping, it's time to get bead embroidering! Using white thread for the top of the pudding, cut a comfortable length of your beading thread, tie a good knot at one end, and find the centre across the top of your pudding. Thread through from the back of the bead foundation to the front, ready to start adding beads on (you can see the dot on our shape for where we need to start, with the thread coming out). |
| 6. Pick up 3 x 11/0 white seed beads and stitch them onto the foundation, using back stitch. To do this, hold the seed beads against the foundation and see where the thread comes out of the last seed bead. Put your needle straight down through the foundation, then come back up in between the second and third bead just added. Pass through the third bead, ready to stitch the next three beads. Continue doing this to fill in your top section. You may find it easier to stitch one or two beads at a time to create a nice curve for the 'running' sauce top. You can also fill in any small gaps with 15/0 white seed beads where needed. Remember to stitch your beads to look as though they are running down the pudding, Take a look at the arrows on our sample, to see which direction they should go in. |
| 7. Our finished Christmas pudding top (note the direction of the beads). We don't mind the black foundation showing through slightly as it represents the delicious pudding underneath! |
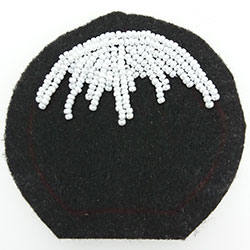
8. Once the top of the pudding is done, it is time to make the actual Christmas pudding! We found it best to start in the middle of the pudding, next to the white top, and fill in the gaps before moving onto the bottom part of the pudding.
| 9. This time, use black thread as the beads for the pudding are dark (we only used white so it showed up in our photos!). Again, using back stitch, pick up 3 x 11/0 metallic brown seed beads, and using back stitch, stitch them horizontally across the pudding. Continue to do this across the width of your pudding. 10. Once you have completed one row, work upwards, line by line, and fill in the gaps between the white pudding top with back stitch, using a combination of 1,2 or 3 beads at a time. |
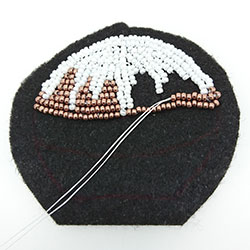
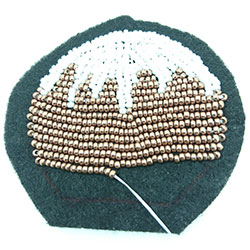
| 11. Once you have filled in the top, it's just the bottom part to go! Using the centre row of metallic brown seed beads as a guide, work row by row downwards and finish the rest of the pudding using back stitch. |
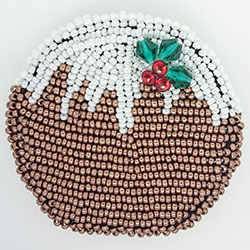
| 12. And there is our (almost) finished pudding! |
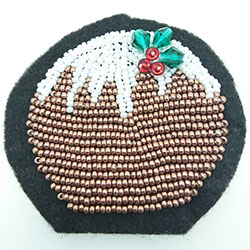
13. Now we're going to add on our holly berries and holly leaves, so get your O-Beads and holly leaves and loosely place them on top of the white bead brandy sauce, until you are happy with where they are. You may need to have a bit of a play to get them to look balanced, but remember you can add or remove as many as you like.
14. To add on the holly berries, you are going to use a stop stitch to hold the O-Beads in place. Watch our video below to see how to do this, then add on your holly berries when you're ready:
15. Once the holly berries are on, you will now need to add the holly leaves. Watch the video showing how to add on focal beads, then add your holly leaves using the same stitch - be careful if you are using crystals to not cut the thread (make sure your tension isn't too tight or loose):
| 16. And here are our holly berries and leaves stitched in place. Very Christmassy indeed! |
17. So the front is done! We now need to trim down the edges closer to the bead-work, ready for the edging beads. Using sharp scissors, cut the foundation close to the beads (leave approx 2-3mm gap) so you have some space to stitch the edge beads onto. Take your time and do this carefully so you don't accidentally cut your bead-work.
18. We'll now add on a lining to help keep the brooch stiff. We used cardboard but you can use anything you have to hand that is firm. Draw around your Christmas pudding, then cut out the lining, but make it approx. half a centimetre (0.5cm) smaller than your Christmas pudding, as you don't want to have to stitch through your lining as well as the foundation and backing. Trim as required to fit (you may need to take off more than the 0.5cm) and glue into place. If you're unsure, watch the video 'Edging a Piece of Bead Embroidery' that's a little lower down in our Blog to see this in action.
19. Our next step is to start work on the back of the brooch. First, lay your Christmas pudding front on your backing, then draw around it and cut out. Keep in mind which side of the backing will be inside your brooch and which will show on the outside of your brooch, ready for the next step (a good tip is to ensure the side with your drawn line will be facing the inside of your brooch).
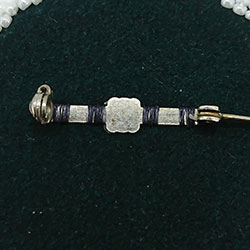
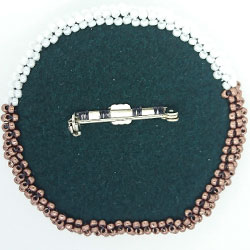
| 20. Now it's time to attach your brooch bar, so glue your brooch bar into place on the outside of your backing, to help hold it. Once the glue has dried, using a short length of beading thread with a knot at the end and a needle, pass up from the underside of your backing to come out close to one edge of your brooch bar. Make some tiny small stitches over the brooch bar to help secure it in place. You don't have to cover the bar in stitches, just a few at equal increments should be enough. After you have finished stitching the bar, finish off your thread neatly on the underside of your backing and trim. The picture shows a close up of our stitched brooch bar. |
19. Great! All that's left is to put it all together and do the edge stitches. Glue your Christmas pudding to the backing and let it dry before starting on the edge beads.
20. For our brooch, we wanted it to be quite chunky so have chosen to do some simple running stitches with the beads to sandwich the edges together. Watch the video below to see how this is done:
| 21. Here are some pictures of the edge stitches partly completed on the left, and ready to start the white edge stitches on the right. |
|
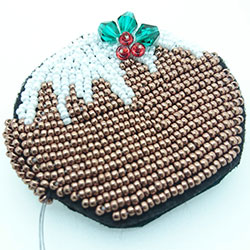
| 22. And we've finished! Here's the front and back of our brooch - we hope your brooch has turned out just how you wanted too! |
|
|
Just want a brief outline of each step? Follow our guide below:
1. Decide on your Christmas pudding shape, then draw and cut this out from your foundation. Remember to draw on your sauce top as a guide to follow too
2. Stitch the white seed bead brandy sauce top first, ensuring the bead orientation 'flows' as the sauce would
3. Fill in the gaps between the sauce, then the rest of the Christmas pudding base with horizontal rows of the metallic brown seed beads
4. Stitch on your holly berries and leaves
5. Trim the foundation close to the stitches, ready for the edging
6. If using, glue on your lining for the brooch
7. Cut out your backing material, then stitch on the brooch bar to this
8. Glue your backing to the lining and foundation (make sure your brooch bar is on the right side!)
9. Stitch the edges together to finish off the brooch and you're done!